I've been too busy to remember to order more K Cups and eventually ran out of bold coffee k-cups last week. For the last few days, I was surviving on the flavoured coffee k-cups (of which I have 1 last box left) which I use more to entertain guests than for my own consumption. It dawned upon me that this would be a good opportunity to try out the My K-cup reusable coffee filter which was still un-opened since I got my Keurig Brewer.
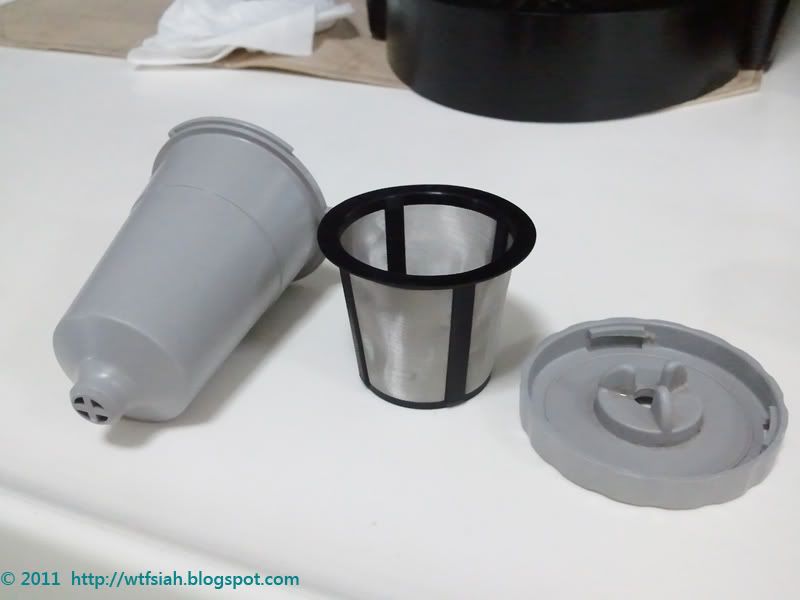
The My K-Cup filter is made of 3 parts:
![]()
(From left to right) Filter Holder, Filter Basket and the Lid
Curious as to how to use the filter properly, I did a search on the internet and came across reviews from people who found that certain modifications had to be done to the filter in order to brew a stronger cup of coffee. The method detailed in this blog entry is just one of the options recommended.
1. Get a used K-Cup, remove the foil seal completely and empty out the coffee powder into a waste bin
2. Rinse off the remaining coffee powder from the K-cup and you will have the following:
![]()
3. Cut 2 slits on the upper, wider rim of the K-Cup like below. Bend this section and cut it away with a pair of scissors (or knife)
![]()
4. Next, start cutting along the upper rim like so:
![]()
![]()
![]()
![]()
![]()
![]()
![]()
![]()
![]()
![]()
![]()
![]()
![]()
The My K-Cup filter is made of 3 parts:
(From left to right) Filter Holder, Filter Basket and the Lid
Curious as to how to use the filter properly, I did a search on the internet and came across reviews from people who found that certain modifications had to be done to the filter in order to brew a stronger cup of coffee. The method detailed in this blog entry is just one of the options recommended.
1. Get a used K-Cup, remove the foil seal completely and empty out the coffee powder into a waste bin
2. Rinse off the remaining coffee powder from the K-cup and you will have the following:
3. Cut 2 slits on the upper, wider rim of the K-Cup like below. Bend this section and cut it away with a pair of scissors (or knife)
4. Next, start cutting along the upper rim like so:
5. Cut all the way till the upper rim is removed like below:
6. The paper filter can be removed from the cup easily as shown, you only need the white cup.
7. Place the filter basket into the white cup. (This is the geist of the mod, the reason for this if the My K-Cup filter is used as supplied, the filter basket lets out too much water at one go, making the brewed coffee diluted)
8. Next, place this into the filter holder
9. Add coffee powder up to 3/4 level of the filter basket. If you add too much powder, the powder might spill out later during brewing. I've used Starbucks Italian Blend where I have requested to have the beans ground to 1 size finer than what you would use for a french press. If the coffee powder is too coarse, water will flow through too easiy.
10. Close the lid of the My K-Cup filter
11. Before you can place the filter in the Keurig machine, you have to remove the current K-cup filter assembly, to do so, place your fingers as shown
12. The next step is to use your other hand to go below the filter assembly to where the coffee normally comes out. Need to apply pressure with your fingers as shown and press upwards to dislodge the filter assembly.
13. And with a little pressure, the filter should be released as below:
14. Now place the My K-cup coffee filter in its place like so
15. One more step before you start brewing, lower the black gasket (rubber ring) attached to the needle that you find on the top part of the brewer that comes into contact with the My K-Cup filter. The needle is normally used to puncture the Disposable K-cups.
It is important to lower it to a point just above the slanted/bevelled edge of the needle. This ensures that no excess water spills out from the top during the brewing process.
16. Finally, close the top part of the brewer, select the cup size button to start. Voila! You get a cup of coffee using your own coffee powder :)
Final Thoughts: The coffee brewed is of acceptable quality but does not match the quality you will get if you use a french press or a slow drip coffee maker as the mechanism of the Keurig is to dispense the coffee quickly so there is not a lot of time for the water to absorb the quality of the powder. There are other mods available to use your own coffee. For example, K-CAPs which are plastic caps for use on recycled disposable K-cups. Other brands have also released their own versions of filters for use in Keurig machines. Any one have experience with these? Do share with me your experiences on what is the best method you have found to brew your own coffee powder in the Keurig machine. Thanks!
Comments